PhotobucketPhotobucketPhotobucketPhotobucketPhotobucket
Showing posts with label repurposing. Show all posts

Sunday, March 6, 2011

Blessed Sunday

Hi!  I got home from my trip yesterday and have been eating up my family to no end.  I had a great time but I always like to be home with my loved ones.

I worked on this piece of Sunday scripture all week while I was gone.  The original measures 9 x 12 and it took me about 7-8 hours all together to finish it.  I knew when I got home I wanted to hang it up in the house.


I snuck out this afternoon with the kids and made a Goodwill run, just to find a frame for it.
Ta-da!  $2.99 is a price I like!  :)


It had a watercolor in it from 1994... I knew before I went in that I would be buying something to repurpose.  I had burlap and turquoise spray paint on my mind.  :)  It worked out great!


There are 8x10 copies of it available right here if you're interested.
I'm excited for the week.  I have lots to talk about and a lot to show you.
Happy Sunday Friends :)
xo,
Chrissie

Monday, October 5, 2009

Tutorial: Patchwork Fleece Scarf

I'm heading up to Ohio in a couple of weeks and I hear it's pretty chilly there already. So I've been keeping an eye out for a few things to bring with me.
I found this fleece scarf at Joanne's for $4.99 and I used my 50% off coupon the other day and brought it home.
You didn't think I was going to wear it just plain like that, did ya?:)
The scarf measures 56" across, so I cut out 10 white muslin rectangles measuring 3" x 6", and 10 rectangles out of scrap fabrics measuring 3" x 6".
Give them a quick press.
I laid them out below the scarf to make sure I liked the placement.
Following the directions on the can, I sprayed the scarf with basting spray. Then I transferred all my rectangles on and smoothed them out. The last one I had to cut in half to fit.
There are 1,000 different ways to sew them on, but I chose to simply do a straight stitch all the way around each piece of fabric. I left about 1/8" around, so it would fray a little when I washed it.
Easy peasy! Then I just trimmed all the extra threads off.
Can you see that I'm wearing a tank top today? I believe the high was 92! I am looking forward to experiencing some real fall weather!
Click below to see other DIY projects.
Happy Monday!!
xo,
Chrissie

DIY Day @ ASPTL

Monday, September 7, 2009

I am a Pottery Barn copy-cat (and How To use a projector to make custom artwork)

Of all the Pottery Barn catalogs, PB Teen is my favorite. At least it has been the last few times. Anyway, I saw this decal and immediately thought it would look good in Logan's room, and he loved it. (We are still decorating it.) I wasn't willing to pay $69 for it, so I took matters in my own hands. Here is the PB version:
And here is my version:
I didn't want to paint directly on the wall, so we used an extra piece of wood measuring 24 x 24. Differences from the original: I wanted it to have a distressed look, and Logan wanted it to say "sk8ter" on it. Total cost: $0. I had the wood and paint already.
This is a quick and easy tutorial.
I used plywood because I already had a piece in the garage. It is a very light wood too, so it's easy to hang. They sell them at Home Depot and Lowe's already cut to this size.
I gave it a coat of white house paint.Using my printer, I printed the decal picture onto a transparency. I used my projector to enlarge it to the size of the wood and traced it. I've had my projector for about 5 years and I use it quite often. I bought mine new at Office Max for about $100, but some libraries or even schools loan theirs out. Perhaps you could find one on Craig's List? Anyway, I love having one.
Moving on...
I used craft paint to paint inside the silhouette. It took 2 coats.
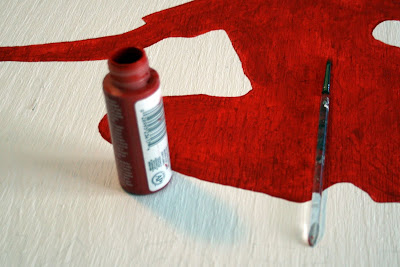
I' ve had the glaze forever, but it still works. I mixed it with brown craft paint to distress the back. I also used a brown ink pad as well.
Last, I put in small eye hooks and wire. That's it.
We hung it above his bed. Now that I see it in the photo, I will probably go back and paint the outside edges of the wood black so it doesn't blend into the wall so much.

It was a quick and easy project, and saved me some moola! Now if I could just find him a bed frame...:)

Now head over to Kimba's for more DIY projects, and Kimm's for Trash to Treasure.

Sunday, August 2, 2009

Before and After x 2

Here is my Before # 1. I got it at Goodwill yesterday for $2.99. It reminded me of a piece that my grandparents used to have in their house.

I think the fish stickers scared people away. It had been marked down three times.
I just peeled them off and sanded the heck out of it.
Here's my favorite assistant helping me wash it off.
A very bright aqua spray paint was applied. After that I distressed it by sanding all the edges and even a little on the surface areas.
If you read my blog regularly, you'll recognize the burlap lamp and house.

I love the pop of color it gives this room. A little more whimsy for this room.

And here is Before and After #2, also found at GW for $1.99. I saw potential in it right away.
Forget the chefs. Check out the faux crystal knob and distressed background. Bingo!

I cut out some scrapbooking paper and covered up the chefs. I used a glue stick in case I ever wanted to repurpose this piece again.

I've been missing my Dad, so I cut out this photo of him as a child, and put this metal scrapbooking frame over it. I got some of those at Big Lots a couple of years ago. I wish I had bought a bunch more!

Instead of hanging it directly on the wall, I wanted to add a pop of lime green. I tied the ribbon on the handles.

Last but not least, the letters Bob. My kids called my Dad Big Bob, so when I find more scrabble letters I'll add the B-I-G.
Voila!
I had a lot of fun making these two projects.
Thanks for looking!
Head on over to Rhoda's for some more thrifty treasures~
xo
Chrissie

Sunday, July 19, 2009

Coffee, anyone?

It's time again for Rhoda's weekly link up over at Southern Hospitality. I am not finding a lot of good deals right now, but it is forcing me to be in "use up what you have" mode. I showed you the elephant cards I made last week. They came from this pack of cards I picked up at a garage sale for 50 cents! It was opened but there were only 2 cards missing!
This pack is going quick. This weekend I made up a bunch of these coffee cards. In "use up what you have", no money is spent. I only allow myself to use fabric and paper scraps that I already have.

Sorry about the picture quality. We had a terrible rainstorm today that forced me to take the pictures inside.
I think this one is my favorite.

And...
Here's a before and after I thought you might appreciate. A friend of mine dropped two of these palm tree paintings off for me to do whatever I wanted to with. The price tags on these were $25 a piece. She gave them to me for free! Here's the before:

And here is the after:

I am not gonna lie. This was a hard project. I ended up spraying the whole thing white, and then going back over it with acrylic paints. The rattan material inside is practically impossible to paint over. I do love how the frame turned out though.
I may scrap the coffee painting and just use the frame.
Just goes to show you that some ideas just don't turn out the way you thought they would. But it's always a learning experience!
Thanks for looking at my thrifty treasures.
Happy Monday:)

Monday, July 13, 2009

Won't you be my neighbor?

Ummm, is it weird to have this much fun painting wooden houses?


Thanks for looking!:)
For those of you who asked, I've listed them in my shop.
xo,
Chrissie