PhotobucketPhotobucketPhotobucketPhotobucketPhotobucket
Showing posts with label organizing. Show all posts

Monday, January 14, 2013

Organizing Your Kids Paperwork


I wanted to show you my system of organizing my kids paperwork from school, including assignments, projects, school photos, art, awards, certificates, etc.  I have been doing it for two years now and it is a very efficient system.


I started with four heavy duty plastic file folder boxes from Staples.  I can't remember exactly how much they were, but I remember thinking they were a little pricey (remember I have to buy four)!  But in the end I'm glad I used them.  I labeled one for each child with their full name.

I keep them in the corner of my room because they won't fit in my closet and I haven't found a better spot for them yet.


In the white basket to the left is where everything goes before it's filed.  I only file two times a year, usually right after Christmas and right after school ends.  Only one of my children wants to save EVERYTHING (every.single.paper)  The other three I sort for them.  We keep everything in that basket until sorting and filing time.  I also keep my label-er in there, with scissors, double-sided tape, big labels, file toppers, contact paper, and a sharpie and pen.


Inside each file box contains a file folder for each grade.
We keep school papers in here, like book reports, special drawings or art projects, holiday papers and projects, and anything that they are especially proud of.  I like to include papers that showcase their handwriting so they can see how much they progress they made through the early years. I also save awards, certificates, and programs when they are in plays or musical performances.


On the front of each folder I use contact paper to put their school picture on the front and a handwritten label  with the grade and year.  Here we have already sorted what we wanted to keep.  The rest we threw away.


I also have one of these for each child.  This is a more personal account of they feel about school.  I also include school pictures and copies of their report cards in here.


Each grade in the "School Year Chronicles" has a space for School Highlights, signs of the time, their yearly favorites, and places for general notes.  I know one day they will look back on these and be so happy to see what their interests were and reflect on fond memories.


This may not work for everyone but it really helps me stay organized and when they go away to college or move out of the house, everything is all in one spot for them.  :)

Happy Monday!


Photobucket

Thursday, August 23, 2012

Back-to-school organization

I completed this project after pinning it awhile back.

(Please note:  The idea and credit links here.  The original woman who thought of this is an organizing genius and actually sells the children's calenders in her etsy shop.  I was trying to be frugal and I came up with my own.  )

To create a back-to-school organizing wall I bought one of these frames for each child. I bought the frames at IKEA.  I chose plexiglass instead of glass for safety issues and it works just as well as a dry erase board.

I just kind of eyeballed where to place everything.  I wanted each one to have the child's name, a weekly to-do and monthly calendar, a notes section, and a place to hang important papers from school.  I covered the backs of the frames with brown craft paper and used a glue stick to adhere the paper.


Then I put it back under the plexiglass and it's a great way for each child to know what they are doing each day of the week.

 
With four kids in different activities, three different schools, and stacks of paperwork for each child, this has really worked out well (for all of us).


We are running low on wall space around here, so I am getting more creative with it.
This hallway is down the kids hall and it may not be the prettiest thing, but it definitely serves its purpose well!  :)


Photobucket

Friday, May 27, 2011

Milestones and Summer

We had two big milestones this week.    Logan is graduating from elementary school and heading off to middle school.  Back in January we found out he was accepted into a Pre-IB program at one of the local magnet schools.  It is going to be a lot of work but I am excited for him. 
These are some pictures from his 5th grade commencement...He got certificates for Runners Club, Art Club, and News Crew.
Logan has come a long way in the last few years and we are so proud of him!


The kids got to celebrate with a big party at the Skating Rink...


His teacher was great!  I don't know how 5th grade teachers do it! 


I went to the party as a "photographer"...We set up a mock photo booth and all the kids got to take two pictures.  I left the party early and had the pictures developed at a one hour place and they were able to take them home that day.  Our PTA did an awesome job!


Ava had her graduation ceremony yesterday...she is leaving our beloved little pre-school and moving on to Kindergarten!!  I was very emotional yesterday...I just love love love her teachers and I was feeling so sad that she is growing up so fast!


I posted this picture of her on Facebook, and I wrote bittersweet...;)
My dad's friend (who is older and wiser! haha) left me a comment that said:
Not bittersweet.  One of the many wonderful transisitions! 
Enjoy every minute!


I needed to hear that!  I am so grateful that she had such a wonderful pre-school experience!
******************************************

So, here is the state of the kids papers, pictures, awards, drawings, etc... from the year.
I weeded through everything and have saved what I want to file for them.


One of my goals this summer is to get all of these scrapbooks and photo albums organized and  up to date!  I've been saying this for a couple of years now...it is just so time-consuming!  But I am determined to get them up to date.


This is the book I use for the kids elementary school years.  I had one for Logan and Ashton and just ordered the same exact ones for the younger two.


It is perfect for keeping all their report cards, school photos, and all the other items you want to save every year. 


I have to admit I am a little nervous about summer...getting back into a routine with all four of them home.
Since I work from home I think I'll working a lot at night again...
I think we're going to have to come up with some sort of a schedule, a loose schedule, but a schedule.
I'm excited too...we haven't signed up for anything!  After a busy year it will be nice to just...BE with them.
We are going to work on our Summer Wish List over the weekend.  Have you made one yet?  I'd love to hear what you're planning on doing.

Photobucket

Tuesday, April 6, 2010

A New Corner of Our Home...One

Instead of striving for a "perfect" house, I'm embracing the "we have four small children" house. Celebrating that fact and trying to curb some of the decor to make it slightly more kid-friendly while still trying to eliminate clutter.
I thought I would show you some of the corners I've been working on...Here's the first one.


My budget for this small project was...$0! I had all the frames stored and a lot of them were different colors. I spray painted them all black so they would all be unified.


I wanted a variety of the kids at mostly recent stages so I just printed them on watercolor paper using my printer at home. I can update them easily.
I centered all the photos around our family name plaque, which has been in several different places around my house.
A few of my favorite...
this silhouette was made at Walt Disney World in 1981. It is me, my brother, and mother.
Remember I told you of my new favorite color combo? I forgot that I had this piece. I bought it from this etsy shop about three years ago.
There's not a lot of room for much on the piano without it looking too cluttery, so I settled for some fresh roses and a spring themed item. This is a good excuse for me to splurge on fresh flowers for myself on a regular basis:)
Thanks for looking. I'll be back with more soon!
xo,
Chrissie
Oh, just in case you were wondering, I used the brown paper method for hanging the frames. I traced them all on brown paper, cut them out, and taped them all over the wall and moved them around until I liked the arrangment. Then I actually hung the frames.
Also, check out Kimm's Trash to Treasure party today for other frugal decorating ideas!

Wednesday, January 6, 2010

My thoughts on Organizing...

My brain works in very mysterious ways, even to me.
I definitely like to get lost in a very creative mess when I am in an artistic mode, which is very often a daily event. But clutter gets me jittery, so I am also constantly cleaning up. I love to organize! It's actually fun for me. (I know, I am a total nerd). The New Year always brings me a sense of order- I want everything clean, organized, and totally functional.

I got this idea from Clover Lane (who incidentally has a great post today).
Mike and I walked through our house, room by room, and pretended we were potential buyers. What needs to be done to make it market-worthy? No, we aren't really selling it right now, but we wrote everything teeny-tiny thing that could be fixed, repaired, or improved. We wrote a list, and on one side are things we can do now, the other side are things that need to be bought or hired out. We will do the things we have list first, and then start on the other. So we have been working on things and really seeing big improvements. Feels good!

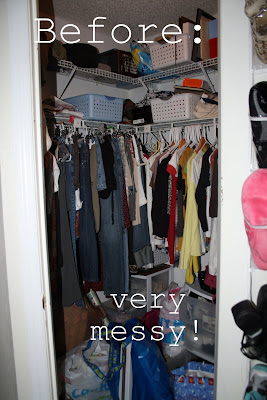
My closet was a half-day project! Here it is right before Christmas....
After:
I used some Christmas money to purchase all the white organizational boxes from Ikea. I can't tell you how good it feels to walk in my closet now. It's a tiny closet anyway, so there's not room for a whole lot. But when there is a place for things it sure makes cleaning up and filing documents and photos so much easier!
When I purge and organize I feel so much more calm.
That is a neccessity when you are running a house full of noise and chaos!:)While the littles are napping, I'm off to paint our family room with a nice fresh coat of paint.
...and then hopefully tonite, I'll be back to creating some sort of messy art fun!
Have a good Wednesday friends!
xo
Chrissie

Wednesday, December 2, 2009

Guest Bathroom...Before and After

We started on the kids/guest bathroom, ahem, in May. There is nothing like an impending Thanksgiving holiday where 25 people are coming over to get your hubby to finish it up.
Here are some before shots. We basically gutted the whole thing. Took out and replaced the bathtub, toilet, sink, and all the tile (floor and shower walls.)
We thought we would do most of the work ourselves. We actually did all the demolition, but turns out there is a lot involved when putting in a jacuzzi tub. You need an electrician and a plumber. Well, we did anyway.
I found that really nice waffle cloth liner at a garage sale during the summer, still in the package. I haven't found a shower curtain I love yet. I'm thinking of making my own out of a white fabric and monogramming the center. Anyone know what kind of fabric works best for a shower curtain?
It is very simple. We replaced the 1980's toilet and sink with the newer streamlined Kohl's throne and a Kohl's pedestal sink. Mike had earned reward points from work at Homegoods, where I got the garbage can, matching soap dispenser, and brushed nickel toilet paper holder. We went with the brushed nickel for all of the fixtures.
My husband insisted on the jacuzzi tub for me because he loves me:) I take a bath almost every night for relaxation, and I have to say I do love it! You can see the new tiles on the shower walls here.
I found that mirror on sale at Ross for 12.99 but it was a dark wood. I had been looking everywhere for a white oval mirror, so I finally bought this one, spray painted it white, and distressed it slightly. (The little postcard is a small print from Jen Lemen.) The towel rack is behind the door and I haven't found anything to hang above it yet.
I repurposed that shelf from Goodwill (4.99 I think?) It was painted white and distressed. The shell frame and small basket holding soap were GW finds too. I added some of my favorite shells. The storage unit was from hubby's reward bucks at Homegoods too.

I wish I had better pictures, but there is no natural light in that room. It feels nice to have another updated room in the house. As many of you home-owners know, it's a never-ending process when you buy an older house!

Thanks for looking. How can it be that we're already half-way through the week again?

xo, Chrissie

Sunday, August 30, 2009

Roadside Rescue (turned into my new sewing area)

This is the story of my new sewing area.
I've really been wanting a spot to work on my new book and quilts where everything was organized and right there. My husband is so good to me and said I could set up a sewing nook in our bedroom. What do you think?

So I've been looking for the "right table." I went to a garage sale last week and saw this table. It was the perfect size but they wanted $20 for it. I just didn't want it that badly.
Then...
I drove back by that afternoon and apparently it didn't sell. There was a sign on it that said "FREE"!!!
I slammed on my brakes and put that sucker in the back of my Durango all by my lonesome. It's my roadside rescue.
I spray painted it red and ordered a piece of glass for it. Instead of an inspiration board I'm using it as an inspiration table. I put a bunch of inspirational pictures on the table and laid my glass on top. I love it.

I found this awesome, naturally distressed shelf at GW a couple of weeks ago. Remember I wanted to cover up the 1980's heart? I made a huge posie and glued it right over the heart. Done. It houses all my sewing supplies.
The stool I already had. I srpay painted her red too and added some funky polka dots. Oh yeah...
I'm so happy with it. It feels really good to sew in there. The only money I spent was on the piece of glass, but I'm totally okay with that. I'm pleased as punch.

Now, head over to Infarrantly Creative for her Roadside Rescue party. I can't win because I've donated a print and coloring book to the winner. :)

This was so much fun! You can't get better than free!

**I've also linked up to DIY over at A Soft Place to Land. There is some genius stuff going on over there!